Follow these steps to set up a program membership (this assumes you already have the membership module turned on):
To get an overview about different membership setups, click here.
Do you want one price or multiple pricing levels for your membership?
The first thing to decide is if you will you have just one price for your membership. This is the most common practice for memberships. If this is the case, please go directly to step 4, Create a New Membership, and skip steps 1, 2, and 3.
If you do have different customer types (also known as user types) in your organization (such as a Default Regular Student, Senior, Volunteer, etc) and do want to create different pricing for different customer types (for example, $100 for your Default Regular Students, $75 for your Seniors, and $50 for your Volunteers), making sure you have these customer types in your system is the first step you'll want to take if you are setting up multiple membership prices within the same program. Remember, THIS IS NOT COMMON. If you feel that you need to set up multiple customer types, submit a support ticket and ask for ASAP's assistance.
How to create user types if you want to charge multiple membership prices
From the left nav panel, select 1 Configure | Setup Data, type a 2 Name and Code for the new customer type and save the new customer type. See your 3 current customer types here. You may also edit and delete customer types here.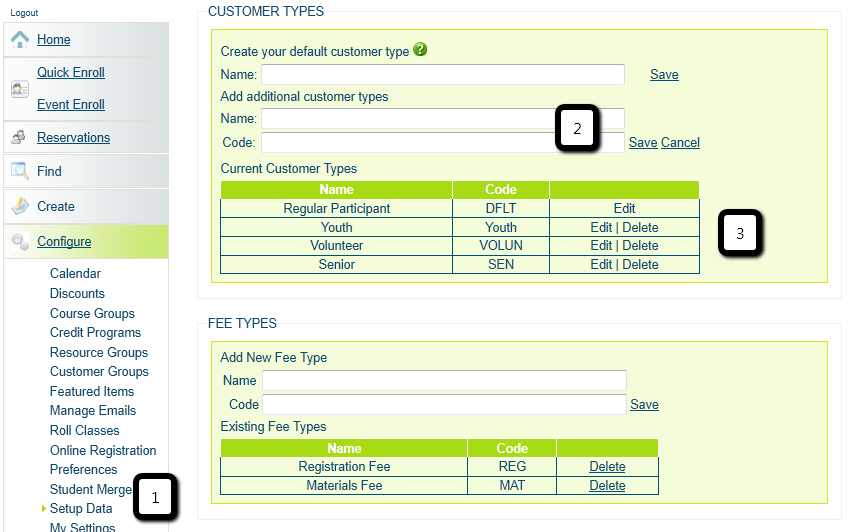
Create a new program membership
To create a new program membership, select 4 Create | New Membership, select 5 Program, type a 6 Name for your membership and include any 7 Description you want to include. This might include details about the benefits of the memberships and/or the different price points/options within this specific membership.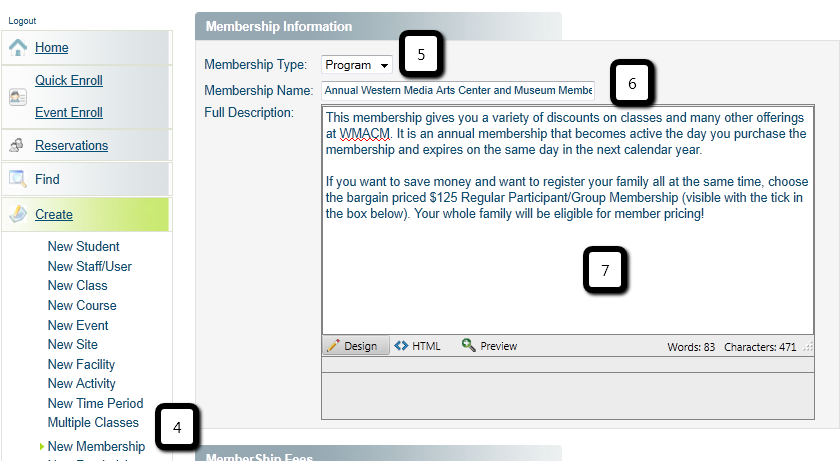
Set up your membership fee
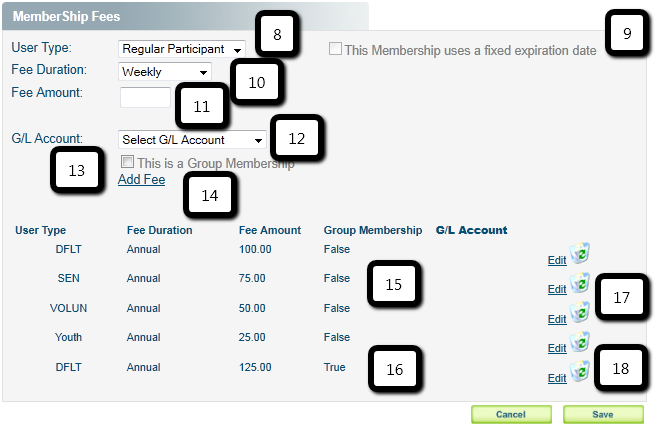
Set up your membership fee at the bottom of the create/edit membership screen. If you want to charge only one price, simple choose your default User Type 8 and create a fee. If you want to set a fixed date for this membership and this specific membership price, select 9 This Membership uses a fixed expiration date. If you choose this, you will be given a calendar with which to choose an expiration date. If you don't choose a fixed expiration date, the membership will expire a week/month/year (etc.) from the purchase date. The duration will depend on the 10 Duration you choose here. Type a 11 Fee Amount for this specific membership. If you are using G|L accounts, select the 12 G|L account that will be associated with this membership. Click here to learn about creating G|L accounts. If this is will be a group membership (e.g. a family membership), select 13 This is a Group Membership. When finished, select 14 Add Fee. Scroll down to see a list of your price levels for this specific membership. Note that the individual memberships will show 15 False beneath the Group Membership header and the group memberships will show 16 True beneath the Group Membership header.
Then if you want to charge different fees for other user types, create a new fee with a new user type and follow steps 8 through 16. Click 17 Edit to the right of any membership price you want to edit and 18 Recycle to the right of any membership price you want to delete. Note that you will not be able to delete a membership fee that has been purchased/used.
What your customers see on your online registration site
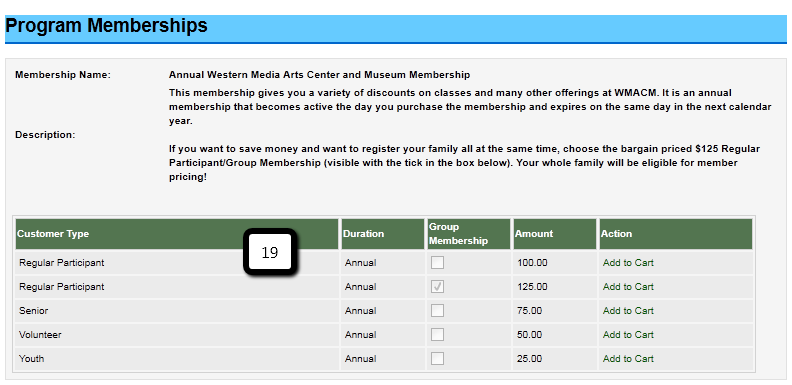
If you have set up multiple prices for different customer types your membership, your customers will see something like 19 this when viewing memberships. Note that both the regular individual and regular group (family) memberships are listed as the same customer type. They are distinguished by the tick in the group membership column for the $125 group/family membership. If you are setting up a tiered price membership like this one, it is recommended that you include text within the membership description to direct your customers to purchase the membership that is most appropriate.