Use the Enroll feature to enroll a registrant in a class, as well as purchase a product or membership. This feature lets you enroll, individual or multiple students and purchase multiple items at one time. If you use Private Lessons, you can add a new lesson to an existing invoice (just the same as you would in ASAP3).

There are 3 main activities with this feature:
Create an invoice
When you enroll in a class, register for an activity or event, or purchase a membership or product, an invoice is created.
- At the top of the Navigation menu, click Enroll.
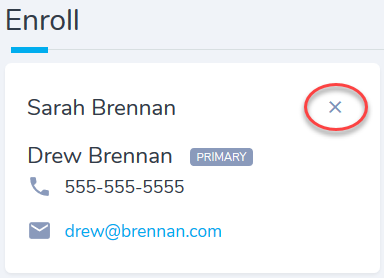
- In the Search for a student box, type the registrant's name.
- Click the applicable registrant.
- In the Search for an item box, type the item your registrant is looking for.
- You will see a list of options as soon as you start typing.
- to search for a product, start typing the product Category name, and then select the product itself.
- Select the item and ASAP generates the invoice information.
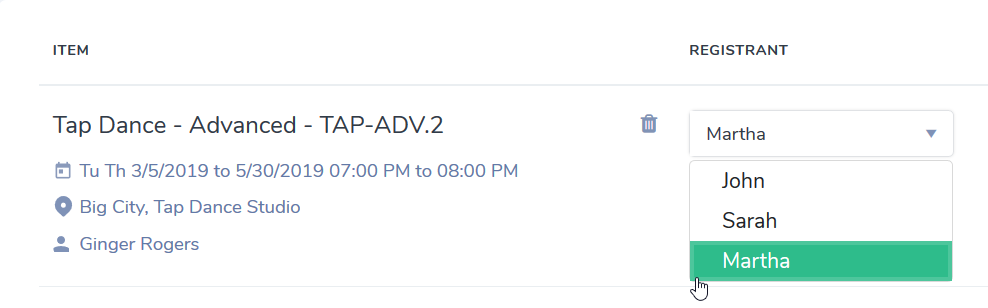
- In the Registrant column, ensure you have the correct registrant.
- If you want to add additional items to the invoice, type your item in the Search for an item box.
- When finished, click Create Invoice.

Add an additional item to an invoice
You can add additional items to an invoice at any point, including as you are creating the invoice, or after it is created. You can also add items for family members to the same invoice.
- If you are not already in the invoice, locate and open the invoice.

- On the page menu, click Add
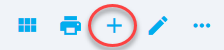 .
.
The Search for an item box opens underneath the last item on the invoice.
- In the Search for an item box, type the item you want to add, and then select the item from the search results.
- To add an item for a family member, select the member from the Registrant list next to the item.
- Click
 .
.
ASAP adds the items to the invoice. You can continue adding items for either the registrant or a family member.
Accept payment on an invoice
The last step in the Enroll feature is to accept payments. After you accept a payment, the invoice status changes to Paid.
- Locate and open the invoice.
- Click
 , fill in the payment information, and complete the transaction.
 - To print the invoice, on the page menu, click
 .
.
The transaction details and the invoice history are displayed at the bottom of the page.