These instructions will show you how to add user access levels, how to edit access for existing and new user access levels and what each item on the user access levels screen means.
Begin by selecting 1 User Access from Config on the left nav panel.

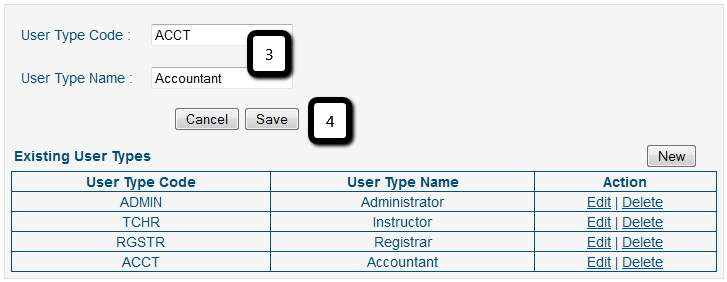
The top section shows your existing user access levels. By default, you will have the following levels: ADMIN (administrator), TCHR (teacher) and RGSTR (registrar). Note that there are two extra user types in the example below. Department Head and No Restrict Teacher are user access levels that were added as new user levels.
Note that each of these levels can be edited or deleted. Exercise caution when deleting levels. If you delete a level that has been associated with a staff member/user, that staff member/user will no longer have a user type associated with his/her login.
If you need to add a new user access level, click 2 New (if you don't need to add a new level and simply want to edit the access for an existing level, skip directly to step 5).

Type a 3 code and name for the new access level and click 4 save.
Whether you are editing an existing user level or are setting up a new user access level, select the 5 user type from the drop down and begin selecting/deselecting the items that you want to make/not make available to specific levels.
Note that if you have created a new user access level, all tick boxes are deselected. You will need to select the rights that you want to give to this new user access level. Pay special attention to item 26 Hide Financial Data. This is the one right that you are actually taking away when you tick the box. leaving this box empty will allow any user access level, with this tick missing, rights to view financial data.
Below is a listing for what each tick allows a user to do:
Class/Event
6 Create/Modify Courses will allow anyone with this user type to be able to create and/or modify courses.
7 Create/Modify Classes will allow anyone with this user type to be able to create and/or modify classes.
8 Enroll Students will allow anyone with this user type to be able to enroll students on admin with Quick Enroll.
9 Drop will allow anyone with this user type to be able to drop students from classes.
10 Transfer will allow anyone with this user type to be able to transfer students out of and into classes.
11 Enroll from waitlist will allow anyone with this user type to be able to enroll a student into a class from a waitlist (if your organization uses waitlists).
12 Roll Classes will allow anyone with this user type to be able to roll classes.
13 Edit Grades and Credits will allow anyone with this user type to be able to edit the grades and credits for students.
14 Selecting Override Drop In Rate allows users to override a drop-in rate for an after school program (if your organization uses the after school module)
15 Override Capacity Warning allows users to override a capacity warning and enroll a student beyond a class capacity when registering a student on admin.

16 View Customer Login will allow anyone with this user type to be able to view customer logins.
17 View Account Detail allows users access to the Family Account page for a student record.
18 View Customer SSN will allow anyone with this user type to be able to view student social security numbers (or whatever information you are capturing in that field and if that data is being collected).
19 Create New Customer will allow anyone with this user type to be able to create a new student/customer with Quick Enroll and Create | New Student on admin.
20 Edit Customer will allow anyone with this user type to be able to edit student/customer records.
21 Delete Customer will allow anyone with this user type to be able to delete student records from your organization, assuming there are no enrollment records associated with the students (a student record with enrollment records cannot be deleted).
22 Create/Split Group Account will allow anyone with this user type to be able to create, add to and remove students from family/group accounts / student associations.

23 View Invoice Data will allow anyone with this user type to be view complete invoice data.
24 Make Payments will allow anyone with this user type to process payments on an invoice on admin.
25Process Refunds will allow anyone with this user type to be view process a refund on an invoice.
26 Give Account Credit will allow anyone with this user type to give credit to a student account (if generic credit is enabled within the system--see step 15 in the linked instructions).
27 Edit Invoice Status will allow anyone with this user type to be able to edit invoice status (paid, pending, partial, void). This will also allow any user with this access to be able to edit invoice transaction records (only for non online credit card transactions).
28 Hide Financial Data will prevent anyone with this user type from being able to view a student's/customer's financial data.
29 View Reports will allow anyone with this user type to be able to view reports.

30 Find Students allows anyone with this user type to find students within your system.
31 Email Access will allow anyone with this user type to be able to send email through ASAP.
32 SMS Access is not currently functional.
33 Create/Modify Staff will allow anyone with this user type to be able to create new and modify existing staff members.
34 System Configuration will allow anyone with this user type to be able to make configuration choices (like User Access).
After you have made any changes to any of these options, click 35 save.

Now when you create a new staff member or edit an existing staff member, these new and/or modified existing staff levels will be available for use.