1. Select which enrollments are editable.
The first step is to determine which lesson enrollments you would like disabled. If you would like to disable lessons, you will need to take the following steps:
- Go to the PLDetail page, which can be accessed via Private Lessons > Enrollments and then clicking the lessons column, or via the active enrollments tab of the Student Detail page.
- On this page, you can select “Turn off ability to roll this lesson to another Time Period.”

- As soon as you navigate away from the PLDetail page the lesson enrollment will be disabled from rolling.
If you would NOT like to disable rolling for an enrollment, you can simply ignore this step.
2. Select which enrollments you would like to roll.
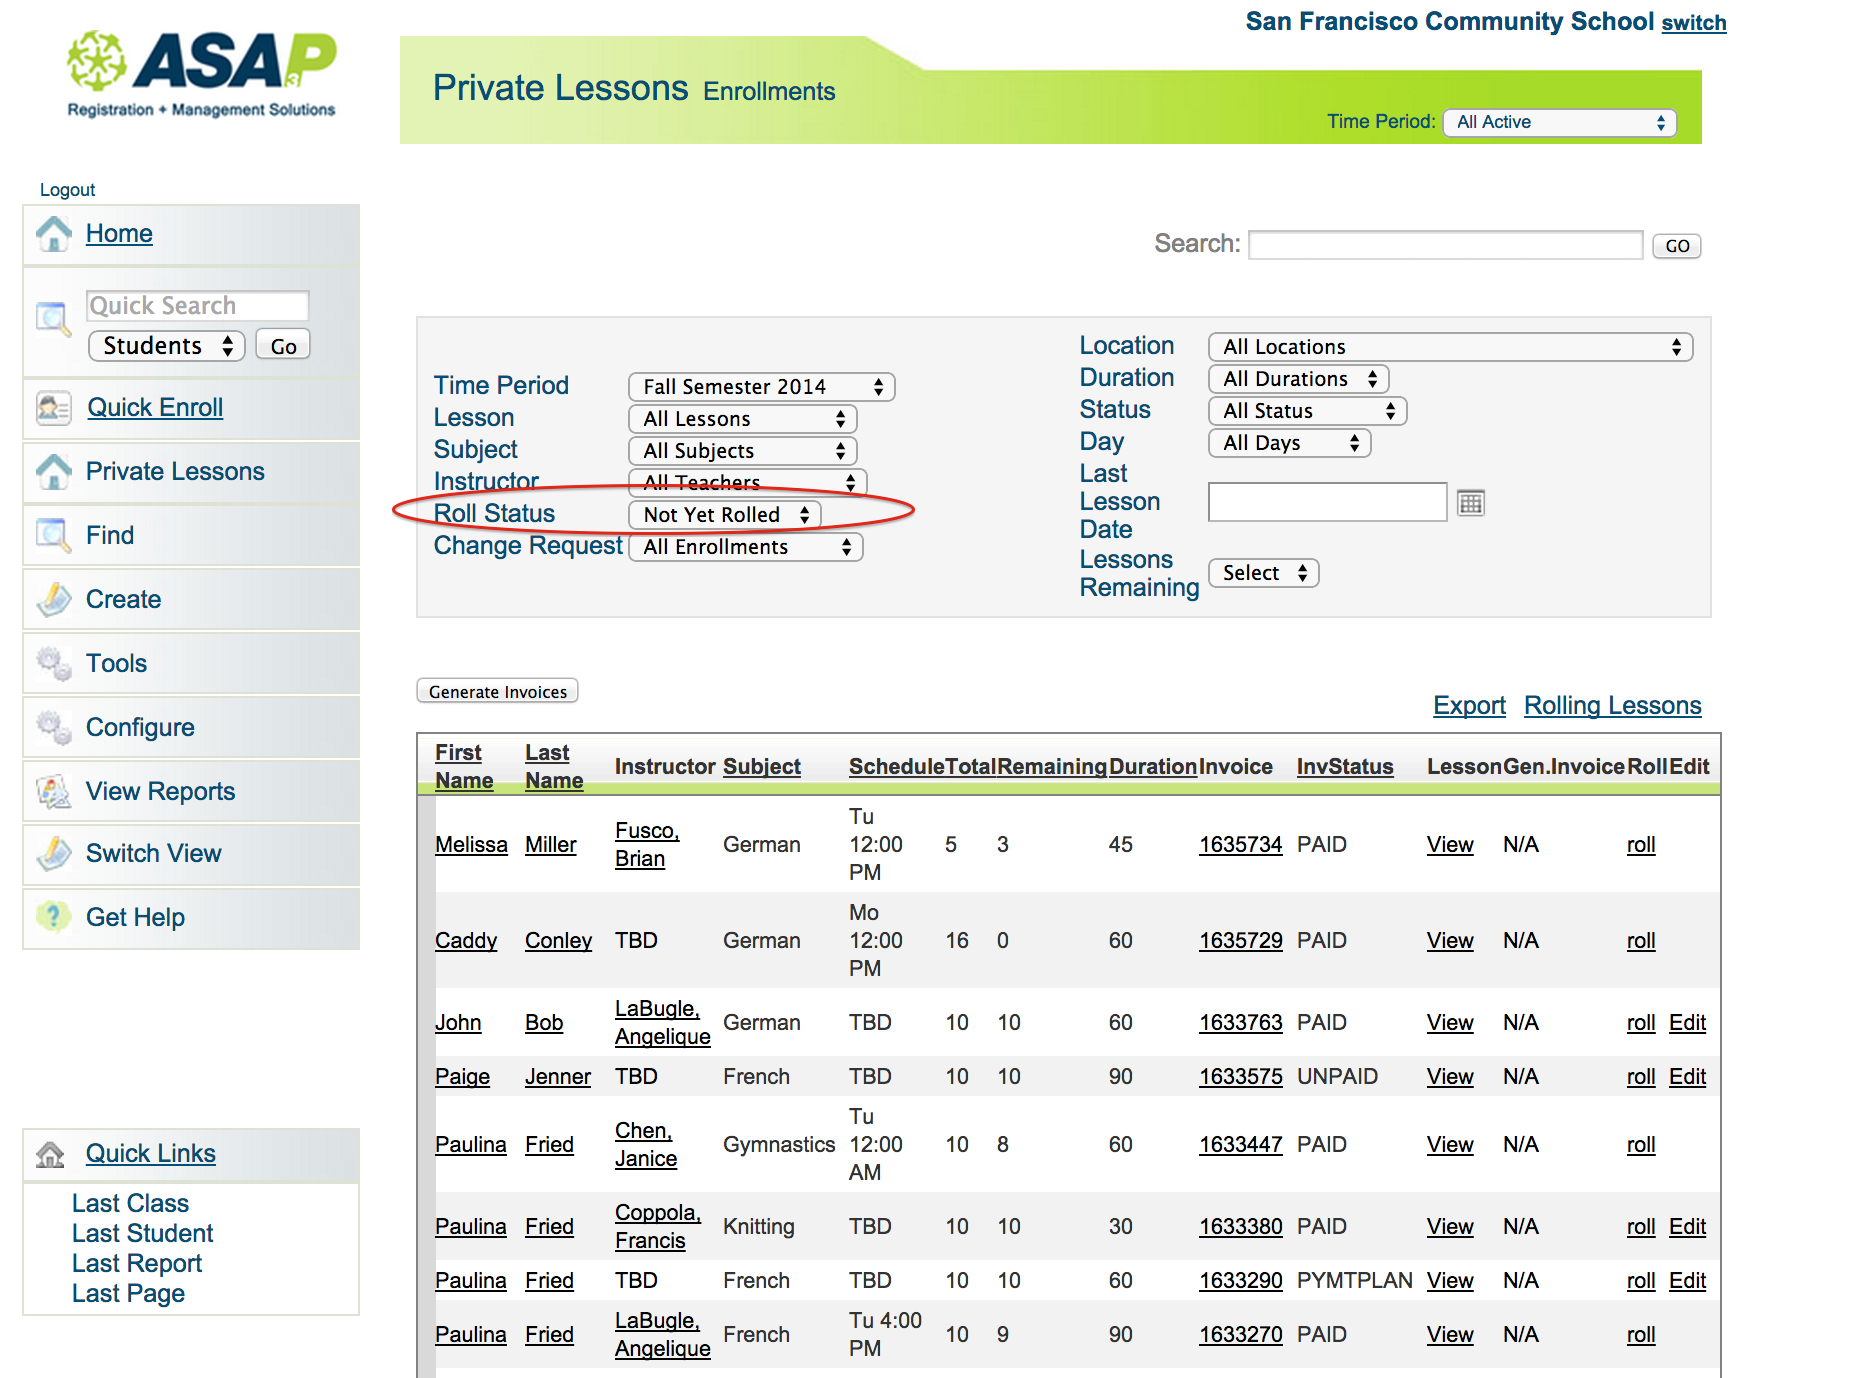
To roll lessons, you will need to go the Private Lessons Enrollments page (PLEnrollments.aspx). You can access this page via Private Lessons > Enrollments. We recommend that you think about the following things before rolling a lesson.
Up to 100 only!!
Please note the maximum number of lessons to roll at a time is 100.
Use filters such as day or subject to create groups with fewer than 100 lessons
- Do you want to roll ALL enrollments for a given Time Period? If not, you will need to disable the enrollment or filter out that enrollment.
- To filter out enrollments, consider if all subjects, instructors, locations and payment statuses should be rolled. For example, you may choose to not roll unpaid lessons, or you may choose to not roll lessons for a certain instructor.
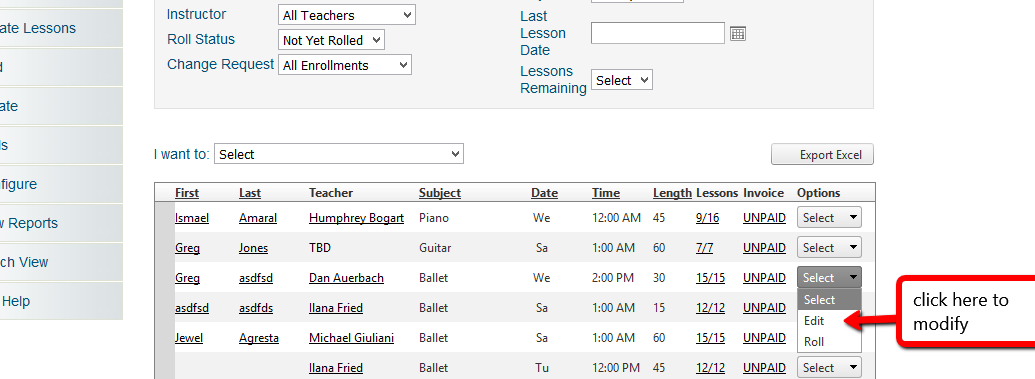
- To preview all rollable lessons, go to the “Roll Status” filter. Then, click lessons “Roll Status” as a filter option. Click on the “Not Yet Rolled” drop-down option. This shows all rollable enrollments for the Time Period.
3. From "I want to" dropdown menu select the "Rolling Lessons" option
4. Choose "Time Period" for rolled lessons
Once you have selected “Rolling Lessons,” a pop-up window will appear. This window allows you to select which Time Period you would like to roll the lessons to. Remember that all lessons displayed in the grid will be rolled (as long as they are not disabled from rolling). Check the number in the bottom right corner of the table. If there are more than 100, use the Filters to reduce to fewer than 100 lessons.
Your first step is to pick the Time Period you would like for the roll. You may only select one Time Period. If you roll from one Time Period to another, the lesson start date will be the first available date in the Time Period. So, for example, if you have an enrollment that runs on Wednesdays, the new enrollment schedule will be the first available the Wednesday in the Time Period. If the Time Period has already begun, it will be the first future available Wednesday in the Time Period.
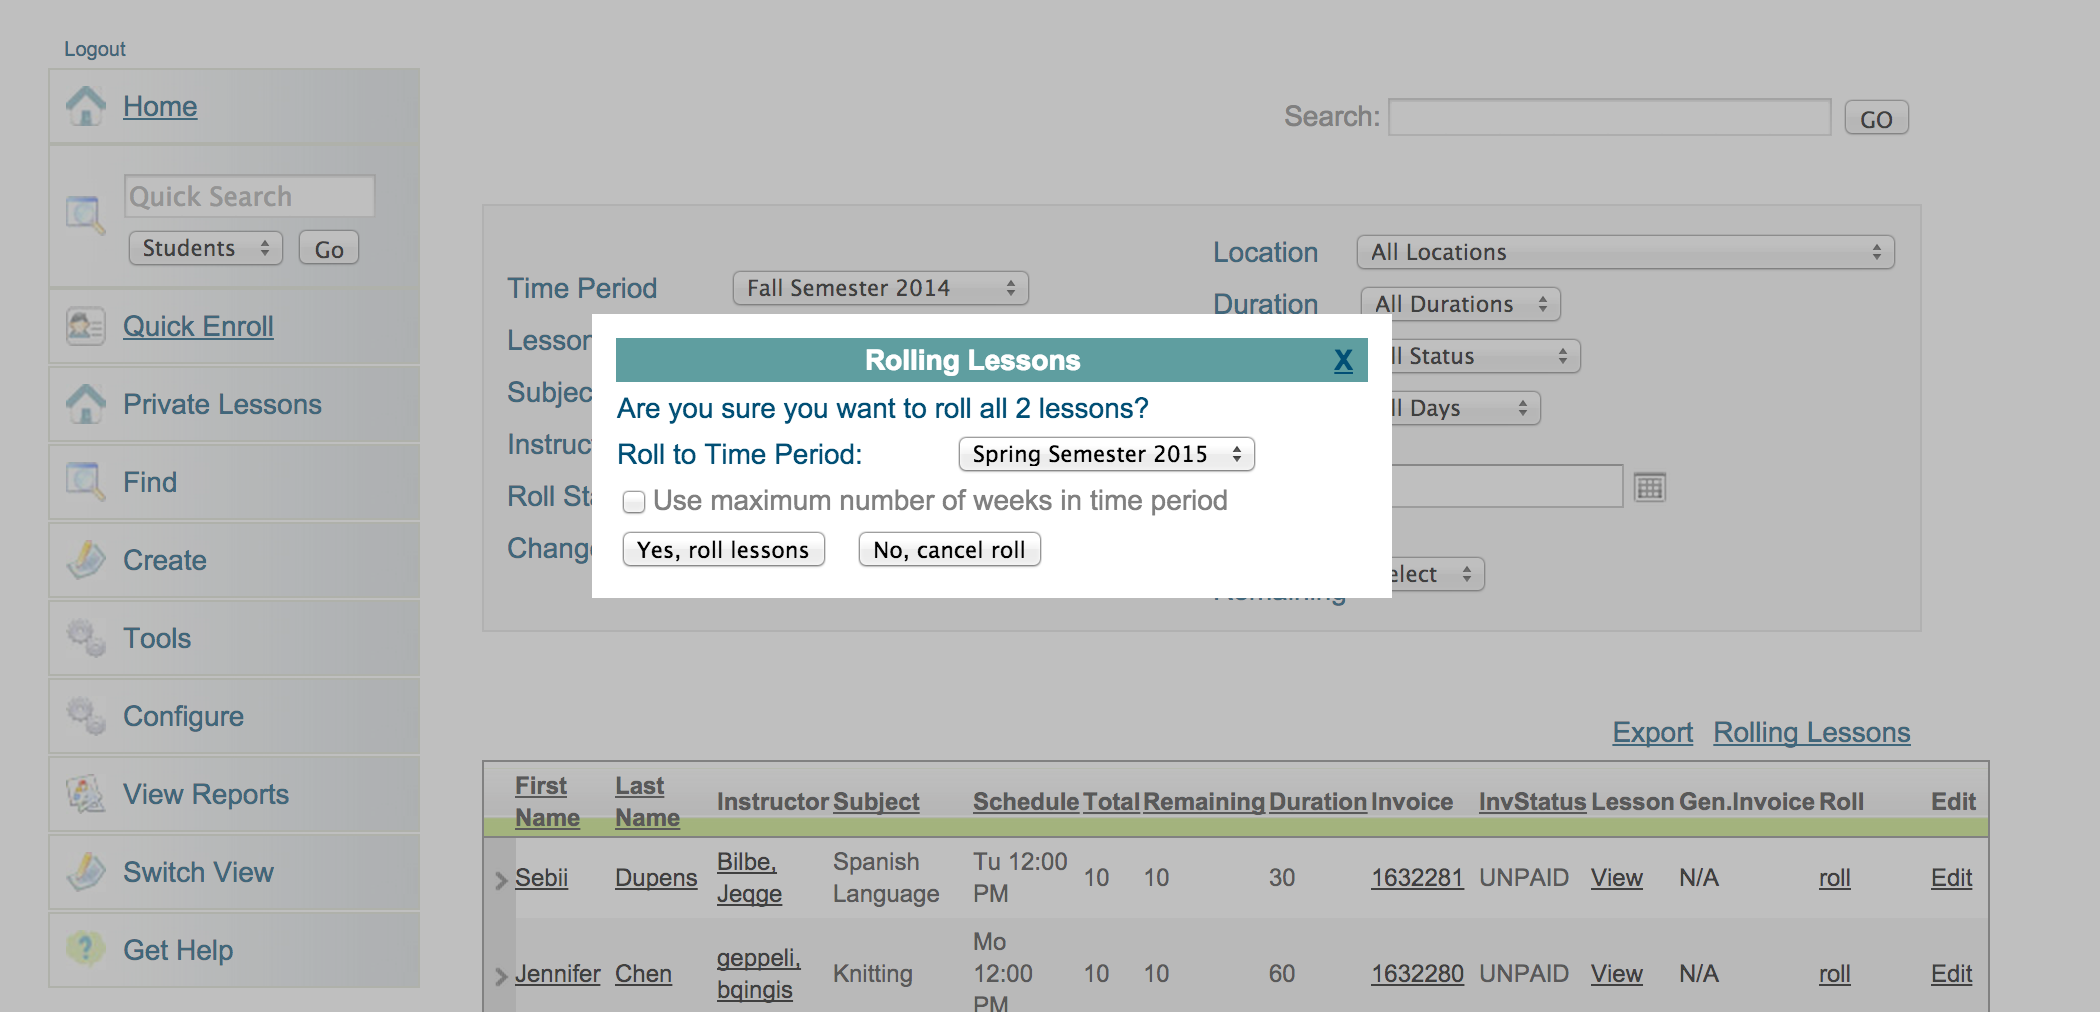
You may choose to roll lessons to the same Time Period. If you do, you must choose a start date for these new lessons.

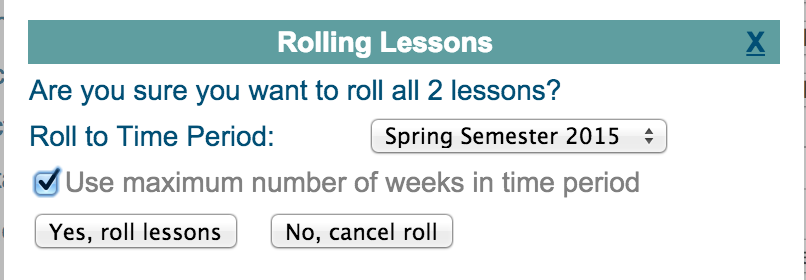
5. Choose if Maximum Number of Weeks in Time Period
You may be rolling to a Time Period that is longer than the original Time Period. For example, Fall 2014 may be 10 weeks long. But Spring 2015 may be 12 weeks long. For this reason, we allow you to specify if the rolled lesson spans across the 12 weeks (the maximum number of weeks), or if you would like to use the default number of lessons configured in the new time period in the Number of Lessons field. If you want the number of lessons to be the number set up in the time period, don't check the box. To use the maximum number of weeks in the time period, when you roll a lesson, check the box for “Use maximum number of weeks in time period.”
6. Review enrollments, and edit if necessary
Once you have rolled lessons, you will see the lessons in the new Time Period. So, for this example, if you rolled lessons to Spring 2015, you will automatically see the lessons under that Time Period view. We encourage to go ahead and review the enrollments. They are all editable after you generate the invoices for them.
Next page > Payments and Changes